TLS/SSL Certificates - For The Rest Of Us
The internet is insecure by default. Attackers can intercept and modify traffic, so we need a way to secure communication and verify the server’s identity.

Encryption ensures data privacy, but without verification, hackers could impersonate a legitimate website, intercepting traffic while still using encryption. This is why TLS/SSL combines encryption with authentication.
TLS is the modern successor to SSL, enhancing security while keeping the core principles intact. Both use X.509 certificates for authentication, and the trust model remains the same.TLS isn’t a different technology just a more secure evolution of SSL.
The lock icon in the browser’s address bar not only indicates that the communication between your browser and the website is encrypted, but it also confirms the identity of the website owner.
Throughout this article, the terms client and browser are used interchangeably, as are server and website. They refer to the same concepts in the context of TLS communication.
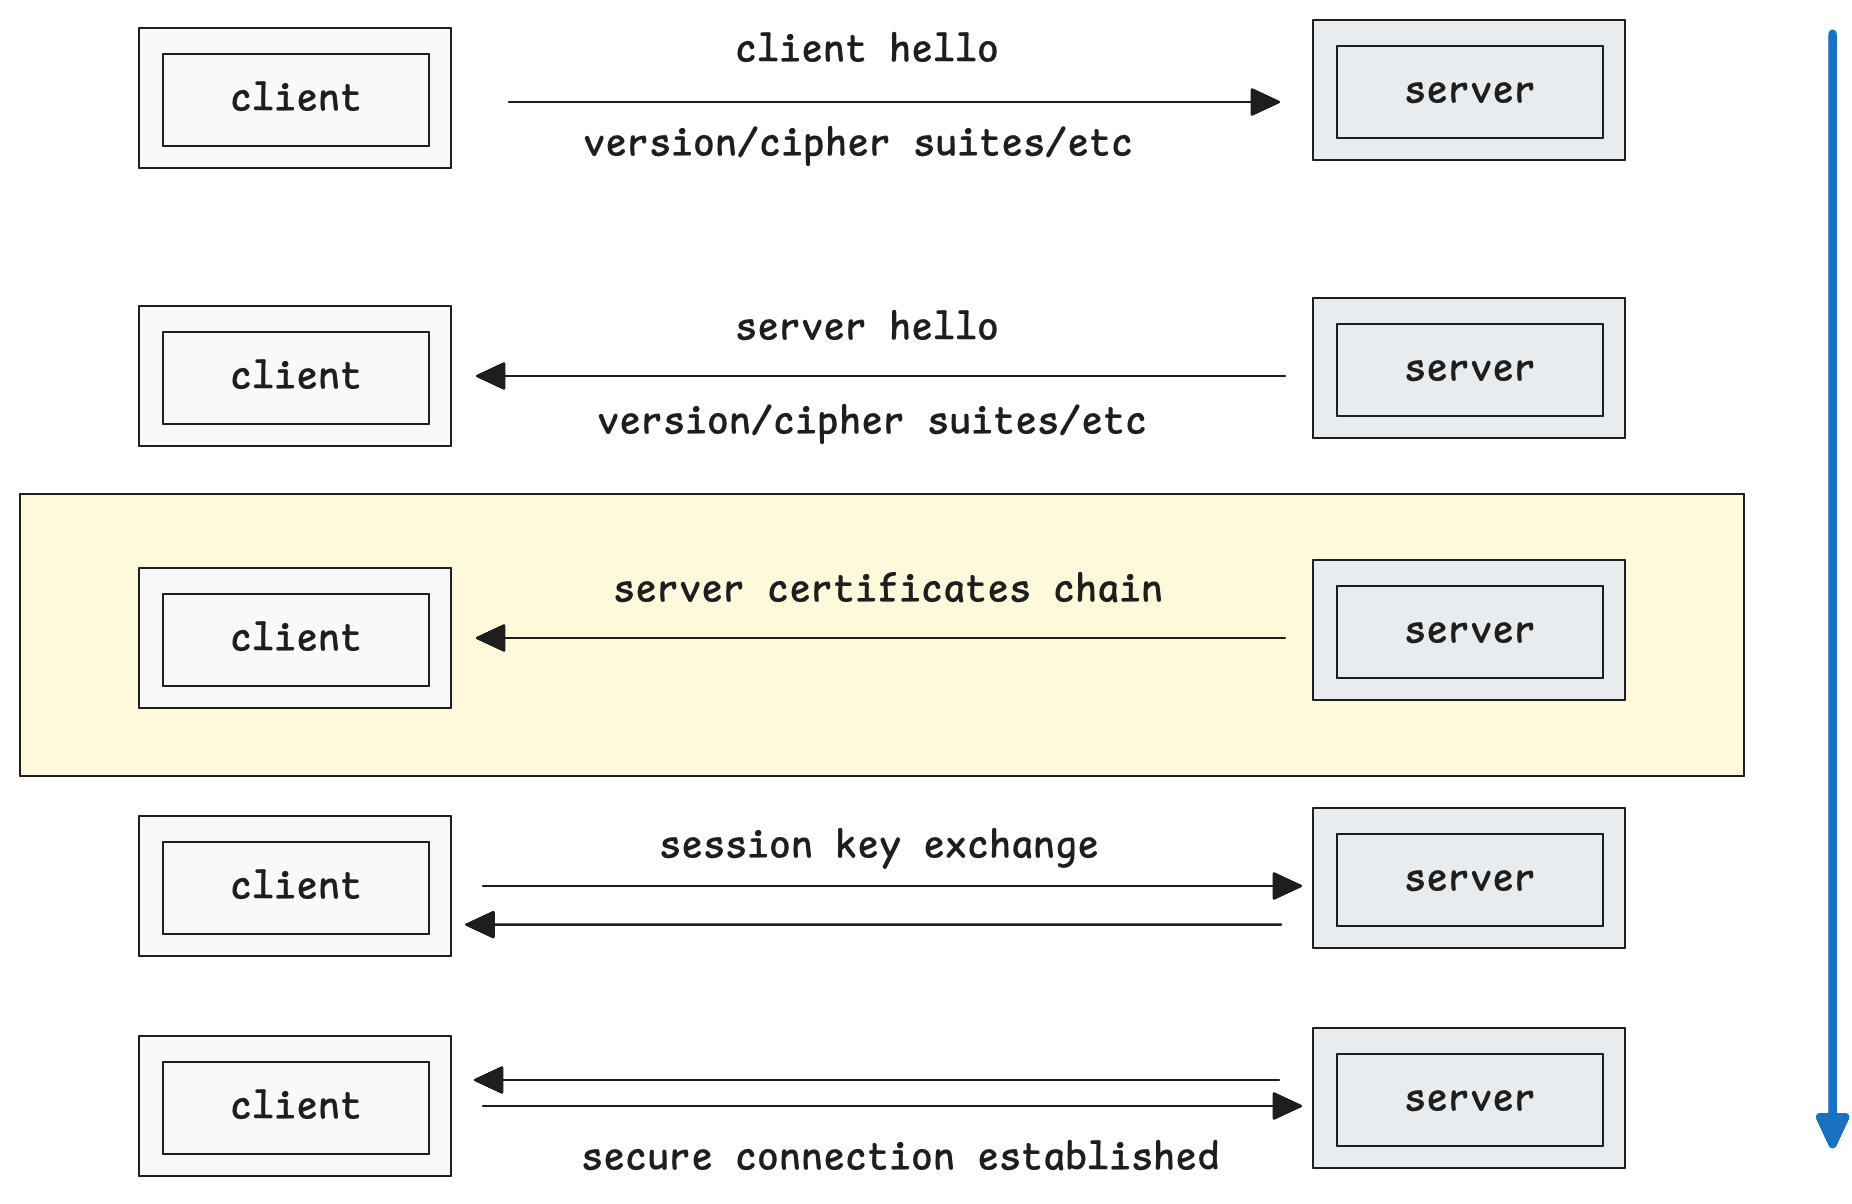
In HTTPS, before any HTTP exchange, your browser and the server perform an TLS handshake, where:
- The server presents its TLS certificate.
- The browser validates the certificate.
- If valid, the browser proceeds with the HTTP handshake.
The TLS handshake involves multiple steps, but this post focuses on certificate validation, the key process that ensures you’re communicating with the right server. Beyond certificate validation, the TLS handshake also negotiates cipher suites and exchanges session keys.
TLS Setup
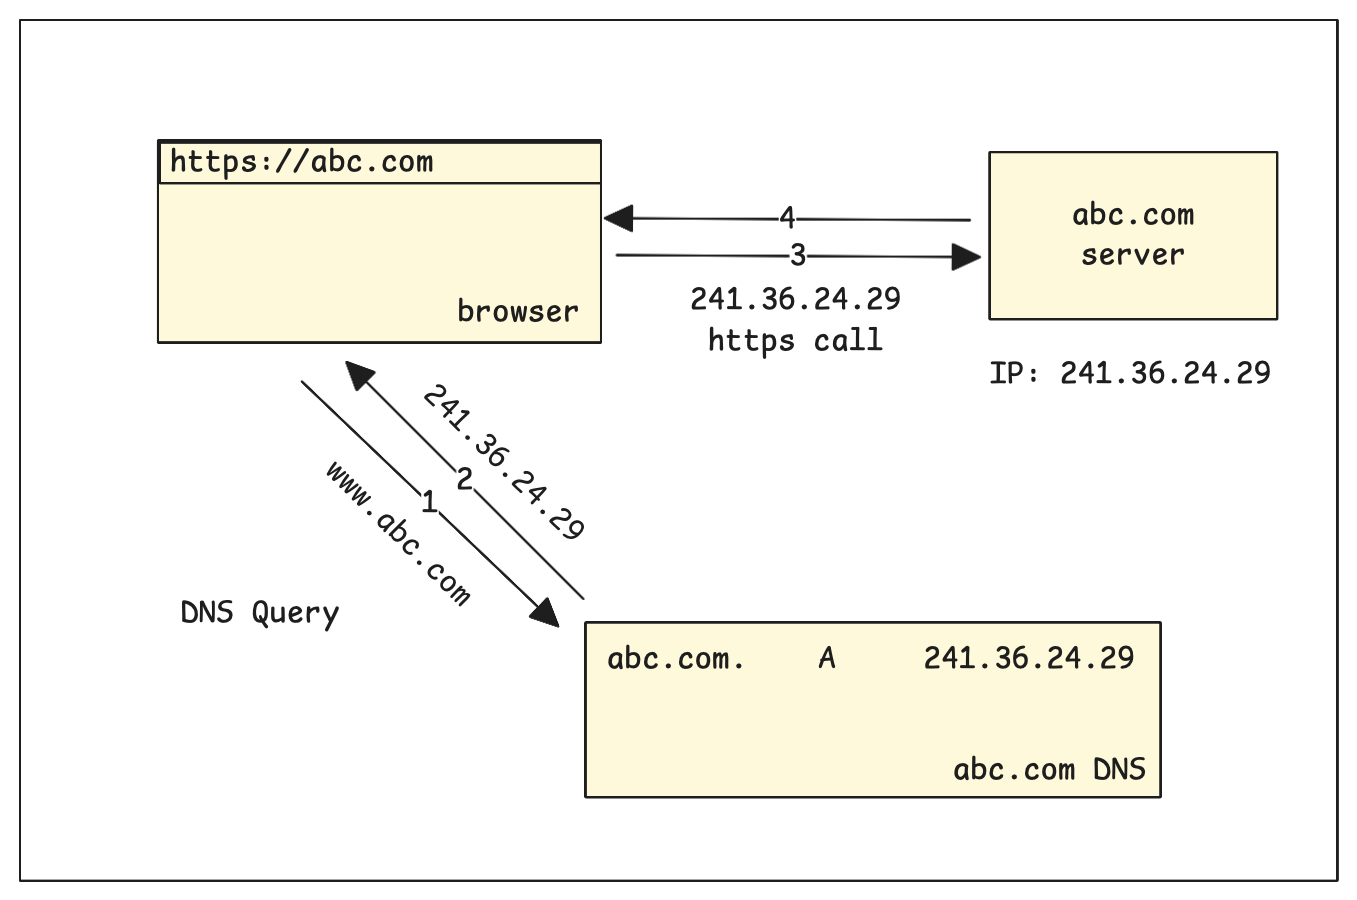
Let’s say you create a website,abc.com. To make it accessible, you:
- Host the website on a server.
- Create a DNS A record pointing abc.com to the server’s IP.
Your website is now available at http://abc.com. To secure it with HTTPS, you need a TLS certificate from a certificate authority (CA) like Let’s Encrypt, Comodo, Digicert, GoDaddy, etc.
A certificate is a document that states that a domain name (abc.com in our example) is owned by you or your organization. A certificate authority (CA) is
a trusted entity that issues these certificates.
When a browser connects to
https://abc.com, it requests the certificate from the server to verify the website’s identity.
The CA verifies your domain ownership and provides a certificate that includes your public key. Now that we have a TLS certificate, let’s see how it actually works to secure communication using public-key cryptography.
Quick Refresher On Public Key Cryptography
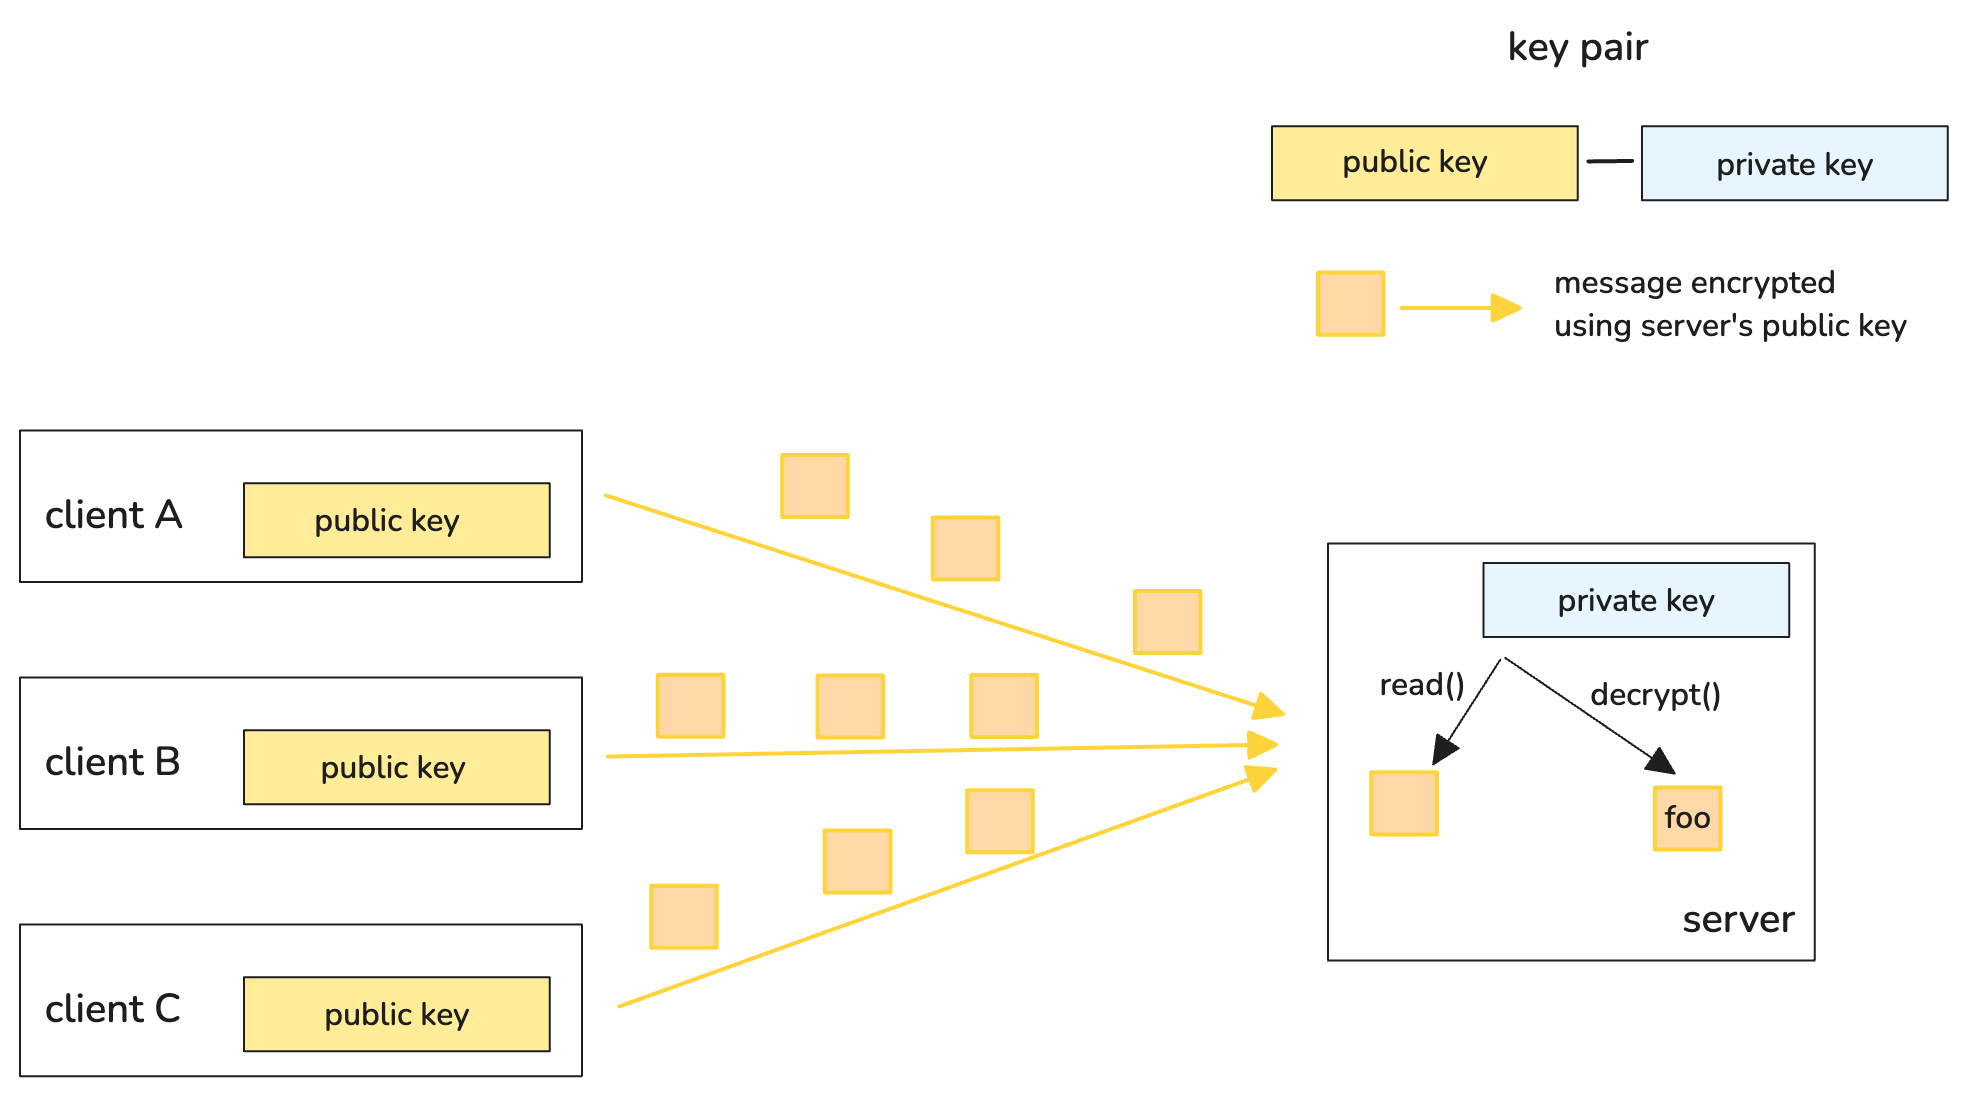
Public key cryptography, also referred to as asymmetric cryptography is a system that uses pairs of keys: a public and a private key. Securing the keys only requires keeping the private key private, the public key can be openly distributed without compromising security.
Your public key can encrypt data, and your private key can decrypt it, and vice versa. You keep the private key secure in your server while the public key can be shared with anyone who wants to send you encrypted data (like browsers).
Receiving the data
When someone needs to send you data securely, they encrypt the data using your public key and send it to you. You then decrypt the data using your private key. Only you can read the data because only you have the private key.
TLS relies on public-key cryptography for secure authentication and key exchange to establish a shared secret key between the client and the server. This shared secret key is then used to encrypt the communication thereafter. This is because public-key cryptography is slow and computationally expensive, so it’s only used to establish a secure channel by sharing the secret key between the client & the server.
Digital Signature
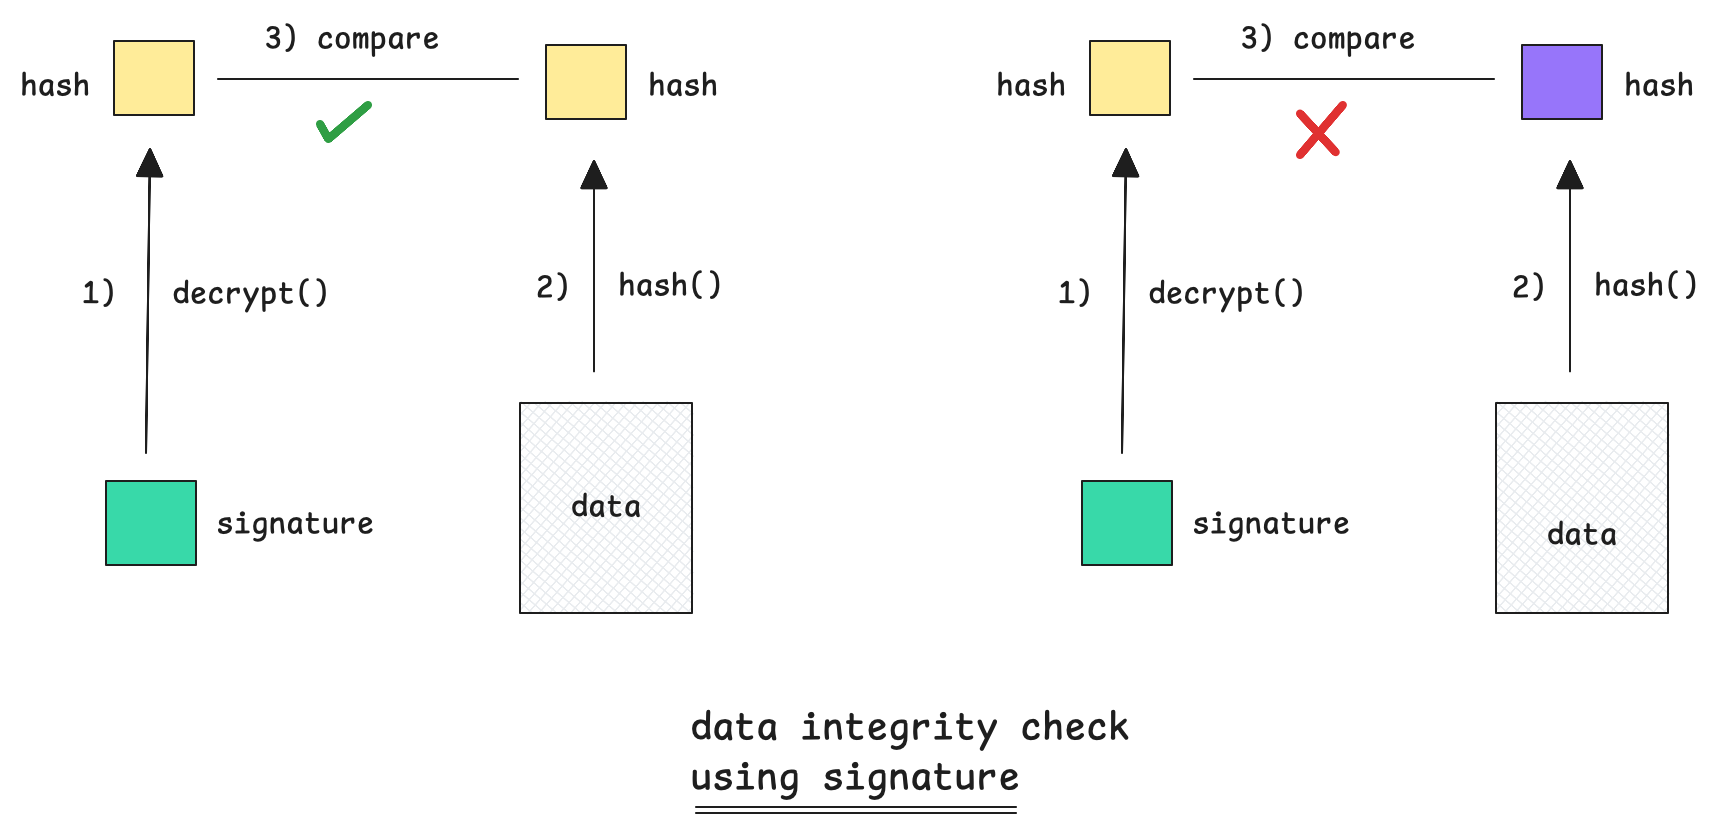
A more common use of private key encryption is digital signatures, which proves the authenticity of a message. Instead of encrypting an entire message, a private key is used to encrypt the message hash, while the public key is used to decrypt it.
If the hash extracted from the signature matches the expected hash of the original data, the message is considered authentic & unaltered (as shown on the left). However, if the hashes don’t match (as seen on the right), it indicates that the data has been altered.
In the case of TLS certificates, the digital signature is created by hashing all certificate fields and then encrypting the hash using the CA’s private key.
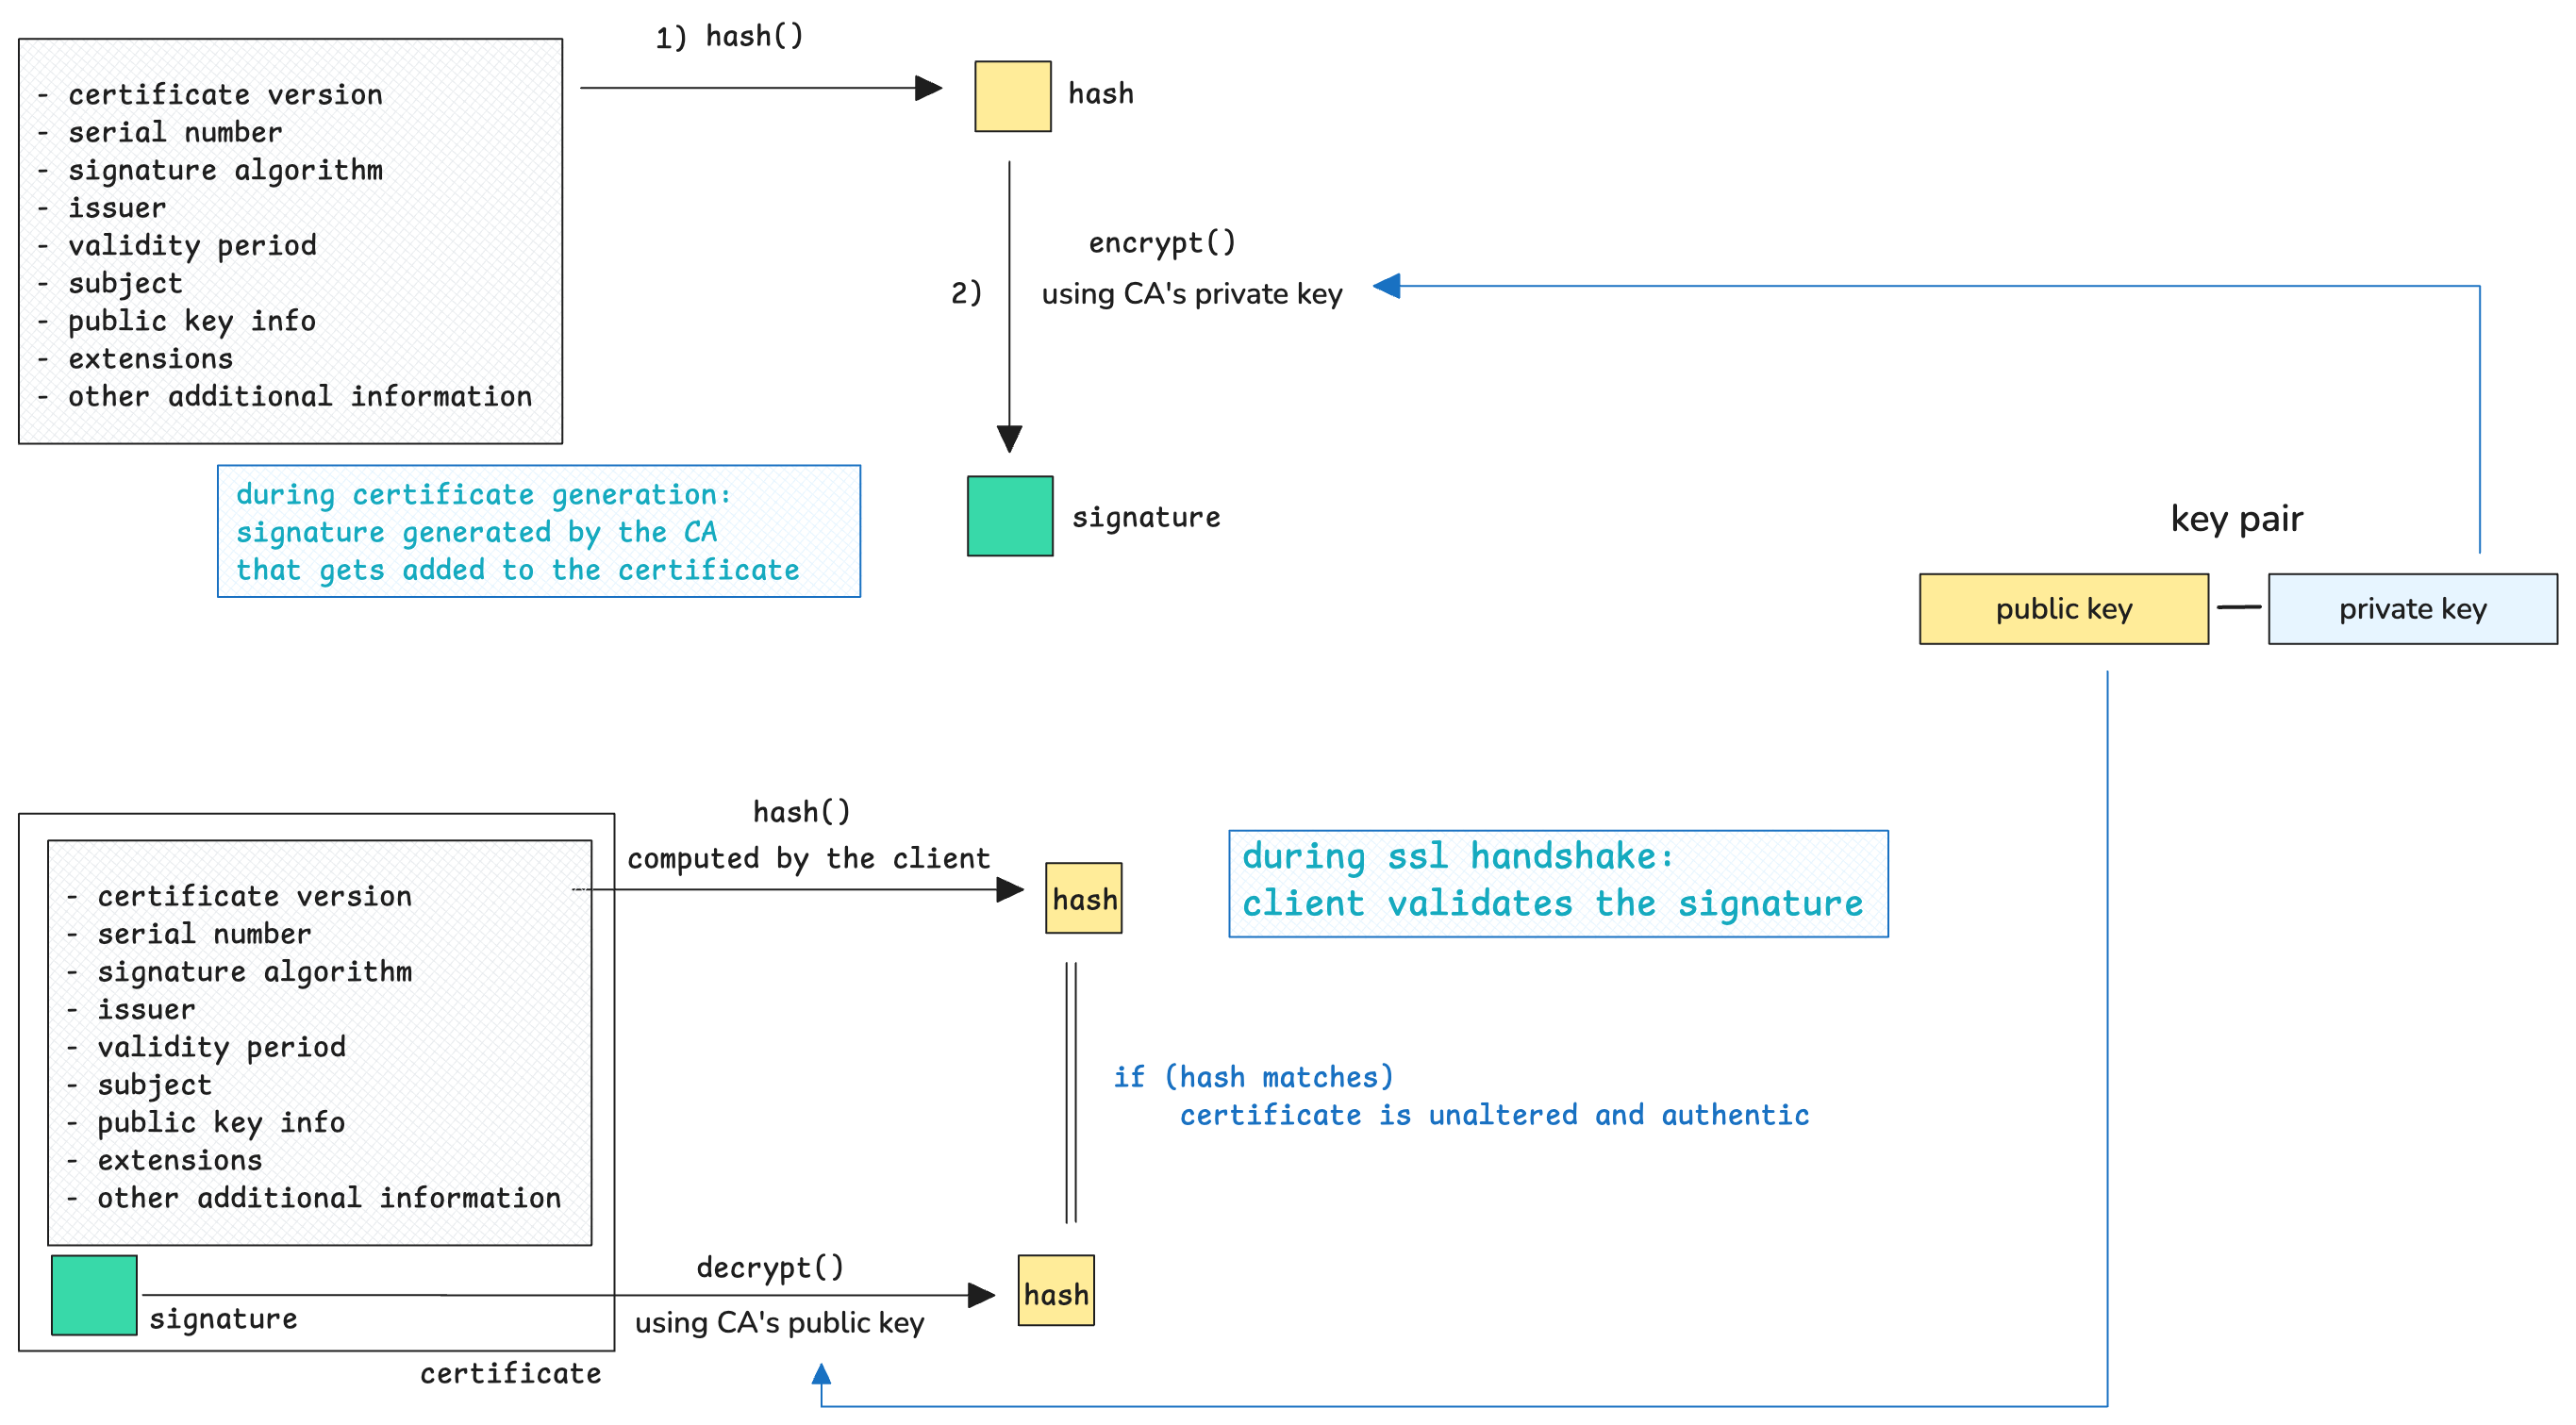
To verify the certificate, the client or browser:
- Decrypts the signature using the CA’s public key.
- Computes the hash of the certificate fields.
- Compares the extracted hash with the computed hash. If they match, the certificate is valid.
When you request a certificate from a CA, you share your public key with them. The public key becomes part of the final certificate that you receive.
When the browser reads your certificate, it will have access to the public key and thus it can communicate with your server securely by encrypting data using that public key.
The CA verifies this information and issues a certificate, which contains your website’s public key and relevant details like allowed domain names. The CA signs the certificate using its private key and adds the signature to the certificate, allowing browsers to verify its authenticity using the CA’s public key.
The certificate you receive from the CA has many components including some of the basic ones like:
- The domain name (abc.com).
- Your public key.
- The issuer (CA) name.
- The expiration date.
- A digital signature from the CA.
Certificate Chain & Hierarchy
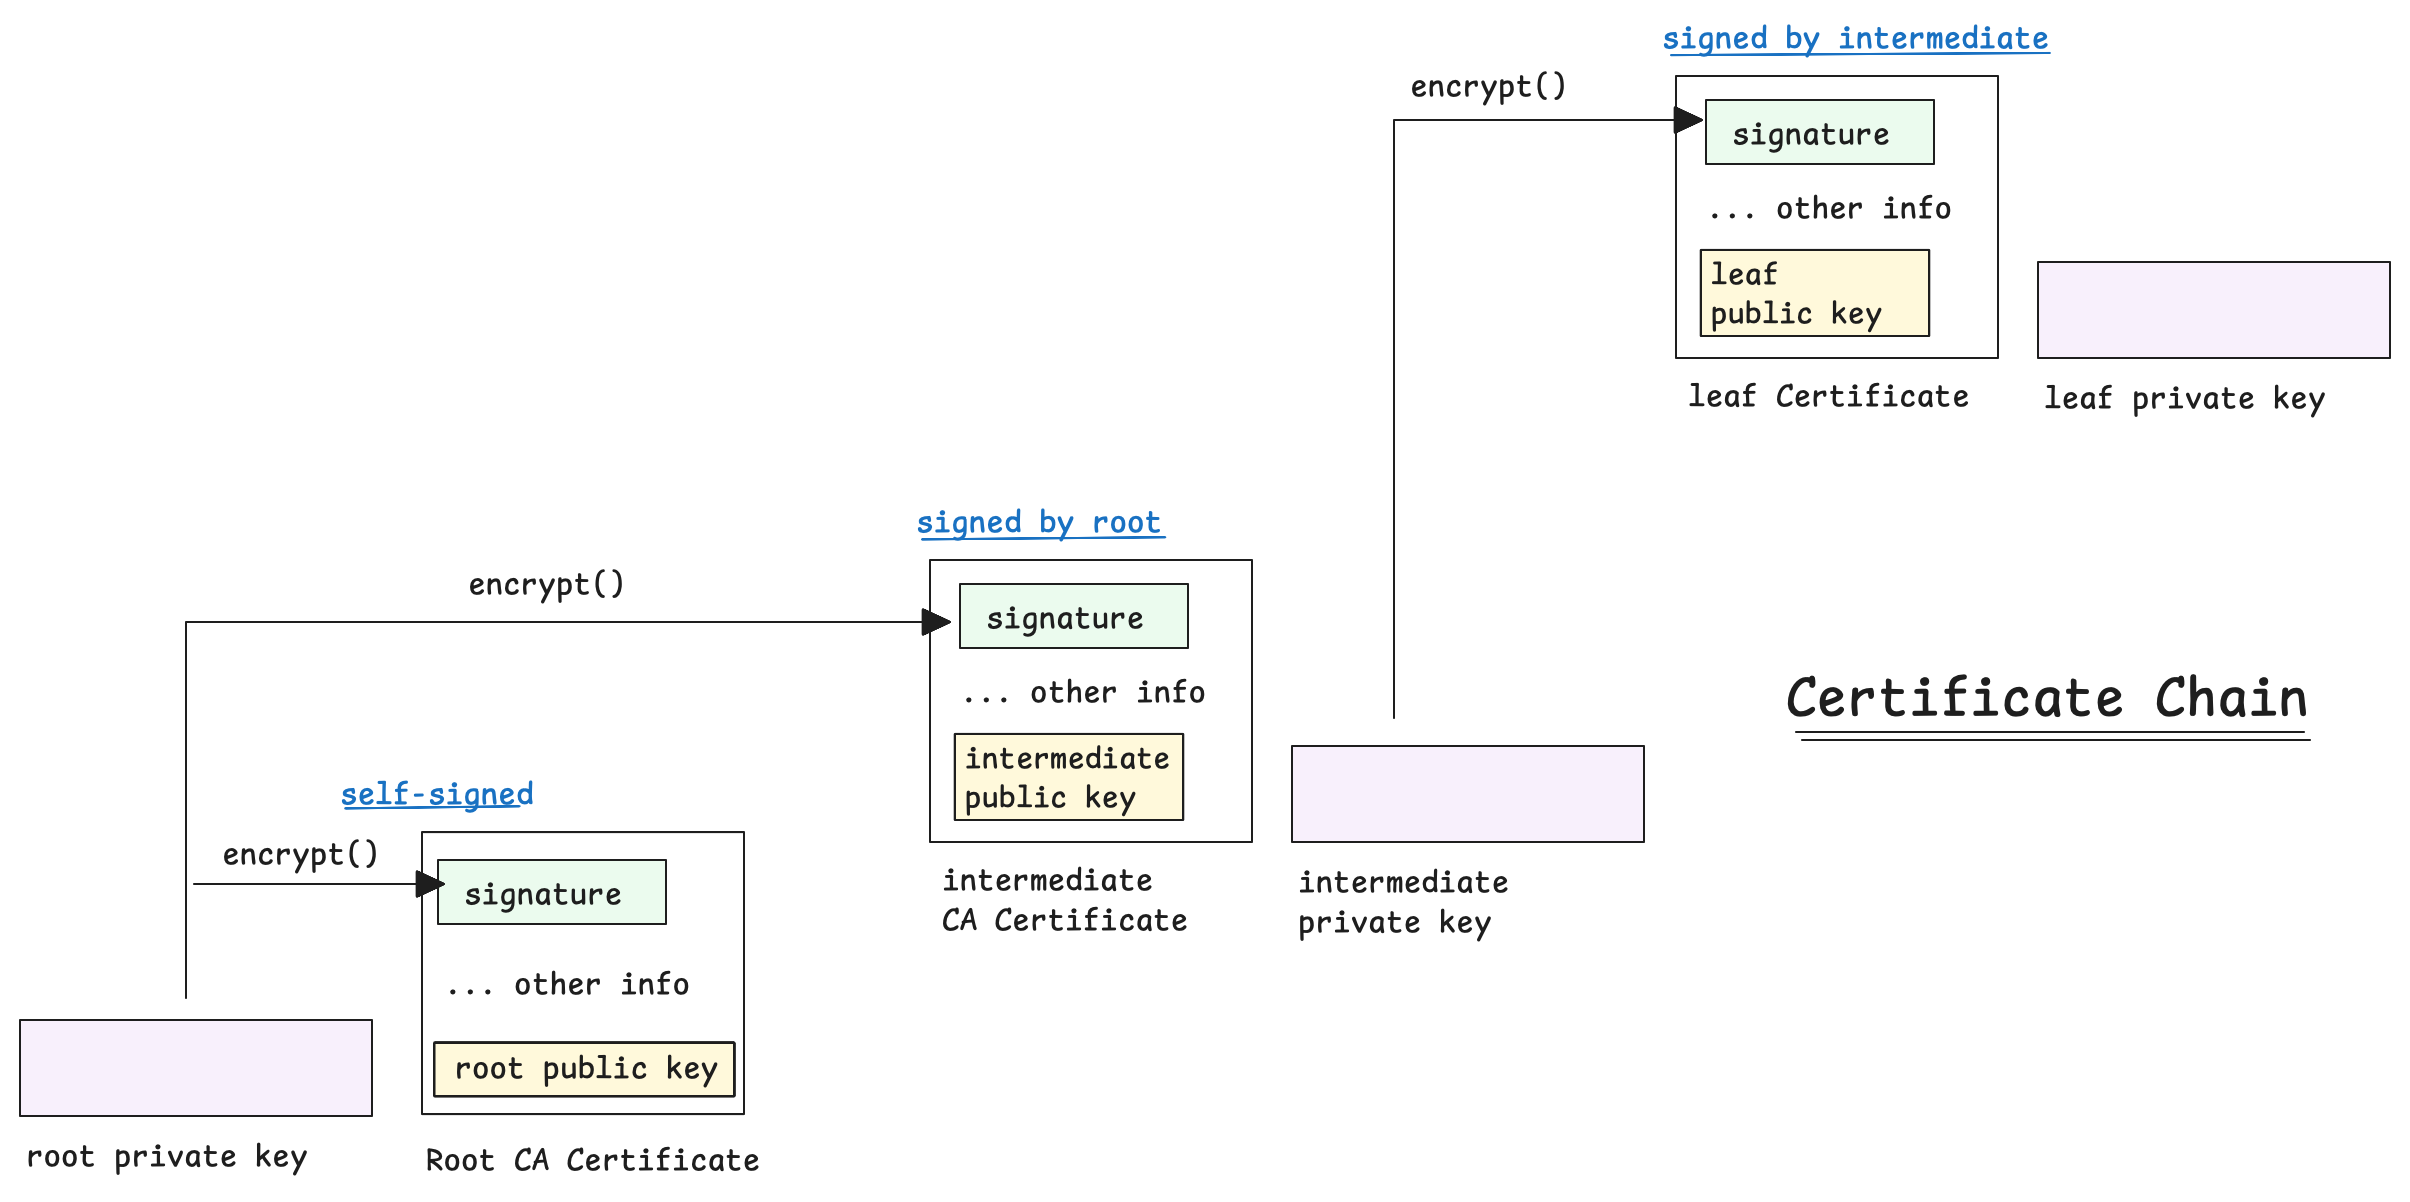
Most certificates aren’t signed directly by a Root CA. Instead, a chain of trust is established where Root CAs have intermediate CAs that sign the certificates. A Root CA can have many intermediates and an intermediate can further have many intermediates. This forms a chain of certificates.
This structure enhances security, if an intermediate CA is compromised, only its certificates are affected, not the entire Root CA.
How Certificate Chains Work:
- Leaf Certificate (Website’s Certificate) → Signed by an Intermediate CA.
- Intermediate CA Certificate → Signed by a Root CA.
- Root CA Certificate → Pre-installed in browsers for trust verification.
For a browser or client to validate a website’s certificate, it must have access to the entire certificate chain up to the Root CA. This is why when a website obtains a TLS certificate from a CA, it also receives a chain of certificates leading up to the last intermediate CA. The Root CA certificate is pre-installed in the client’s trust store rather than being sent by the server. This prevents attackers from forging fake root certificates and tricking users into trusting malicious websites.
Technically, the main difference between a Root CA and an intermediate CA is that the Root CA is self-signed, while the intermediate CA is signed by a Root CA or another intermediate CA. From an operational perspective though, the Root CA is more secure and is only used to sign Intermediate CAs.
A self-signed certificate is a certificate that is signed by its own private key instead of another CA’s private key. This is typically used for Root CAs.
Example of a Root CA Certificate
Subject: CN=Example Root CA
Issuer: CN=Example Root CA   # Self-signed
X509v3 Basic Constraints: critical
    CA:TRUE
X509v3 Key Usage:
    Certificate Sign, CRL Sign
Example of an Intermediate Certificate
Subject: CN=Example Intermediate CA
Issuer: CN=Example Root CA   # Signed by Root CA
X509v3 Basic Constraints: critical
    CA:TRUE
X509v3 Key Usage:
    Certificate Sign, CRL Sign
Example of a Leaf Certificate
X509v3 Basic Constraints:
    CA:FALSE
X509v3 Key Usage:
    Digital Signature, Key Encipherment
Here’s what a certificate (certificate chain) looks like in .pem format:
-----BEGIN CERTIFICATE-----
MIIBIjANBgkqhkiG9w0BAQEFAAOCAQ8AMIIBCgKCAQEA7Ddyt2hQEdIjxNXL8E0L9
EkRebVh0Cht6A27En2Zm58efVG9qj2OXYbH2Z7YqjrKcLzFqJktmAc8k9qHDHLK6
-----END CERTIFICATE-----


-----BEGIN CERTIFICATE-----
MIIBIjANBgkqhkiG9w0BAQEFAAOCAQ8AMIIBCgKCAQEA7A2dz5G7klz5LQHjR1YWX
X6SFIitFJGDEBv2jIdVsZ7v7BzQ7BEBbD97bZ5aBaejZGjw8ImlOp2D5dPzD4Q3c
-----END CERTIFICATE-----

-----BEGIN CERTIFICATE-----
KSmjIBIjANBgkqhkiG9w0BAQEFAAOCAQ8AMIIBCgKCAQEA2dz5G7klz5LQHjR1YWX
X6SFIitFJGDEBv2jIdVsZ7v7BzQ7BEBbD97bZ5aBaejZGjw8ImlOp2D5dPzD4Q3c
-----END CERTIFICATE-----
While these certificates are encoded in PEM/Base64 format, their contents can be understood as follows:
X.509 is the standard that defines the certificate structure. It is a complex yet highly flexible structure. The formatting used in the image below does not represent the X.509 standard but is only used to explain the various fields present in the certificate.
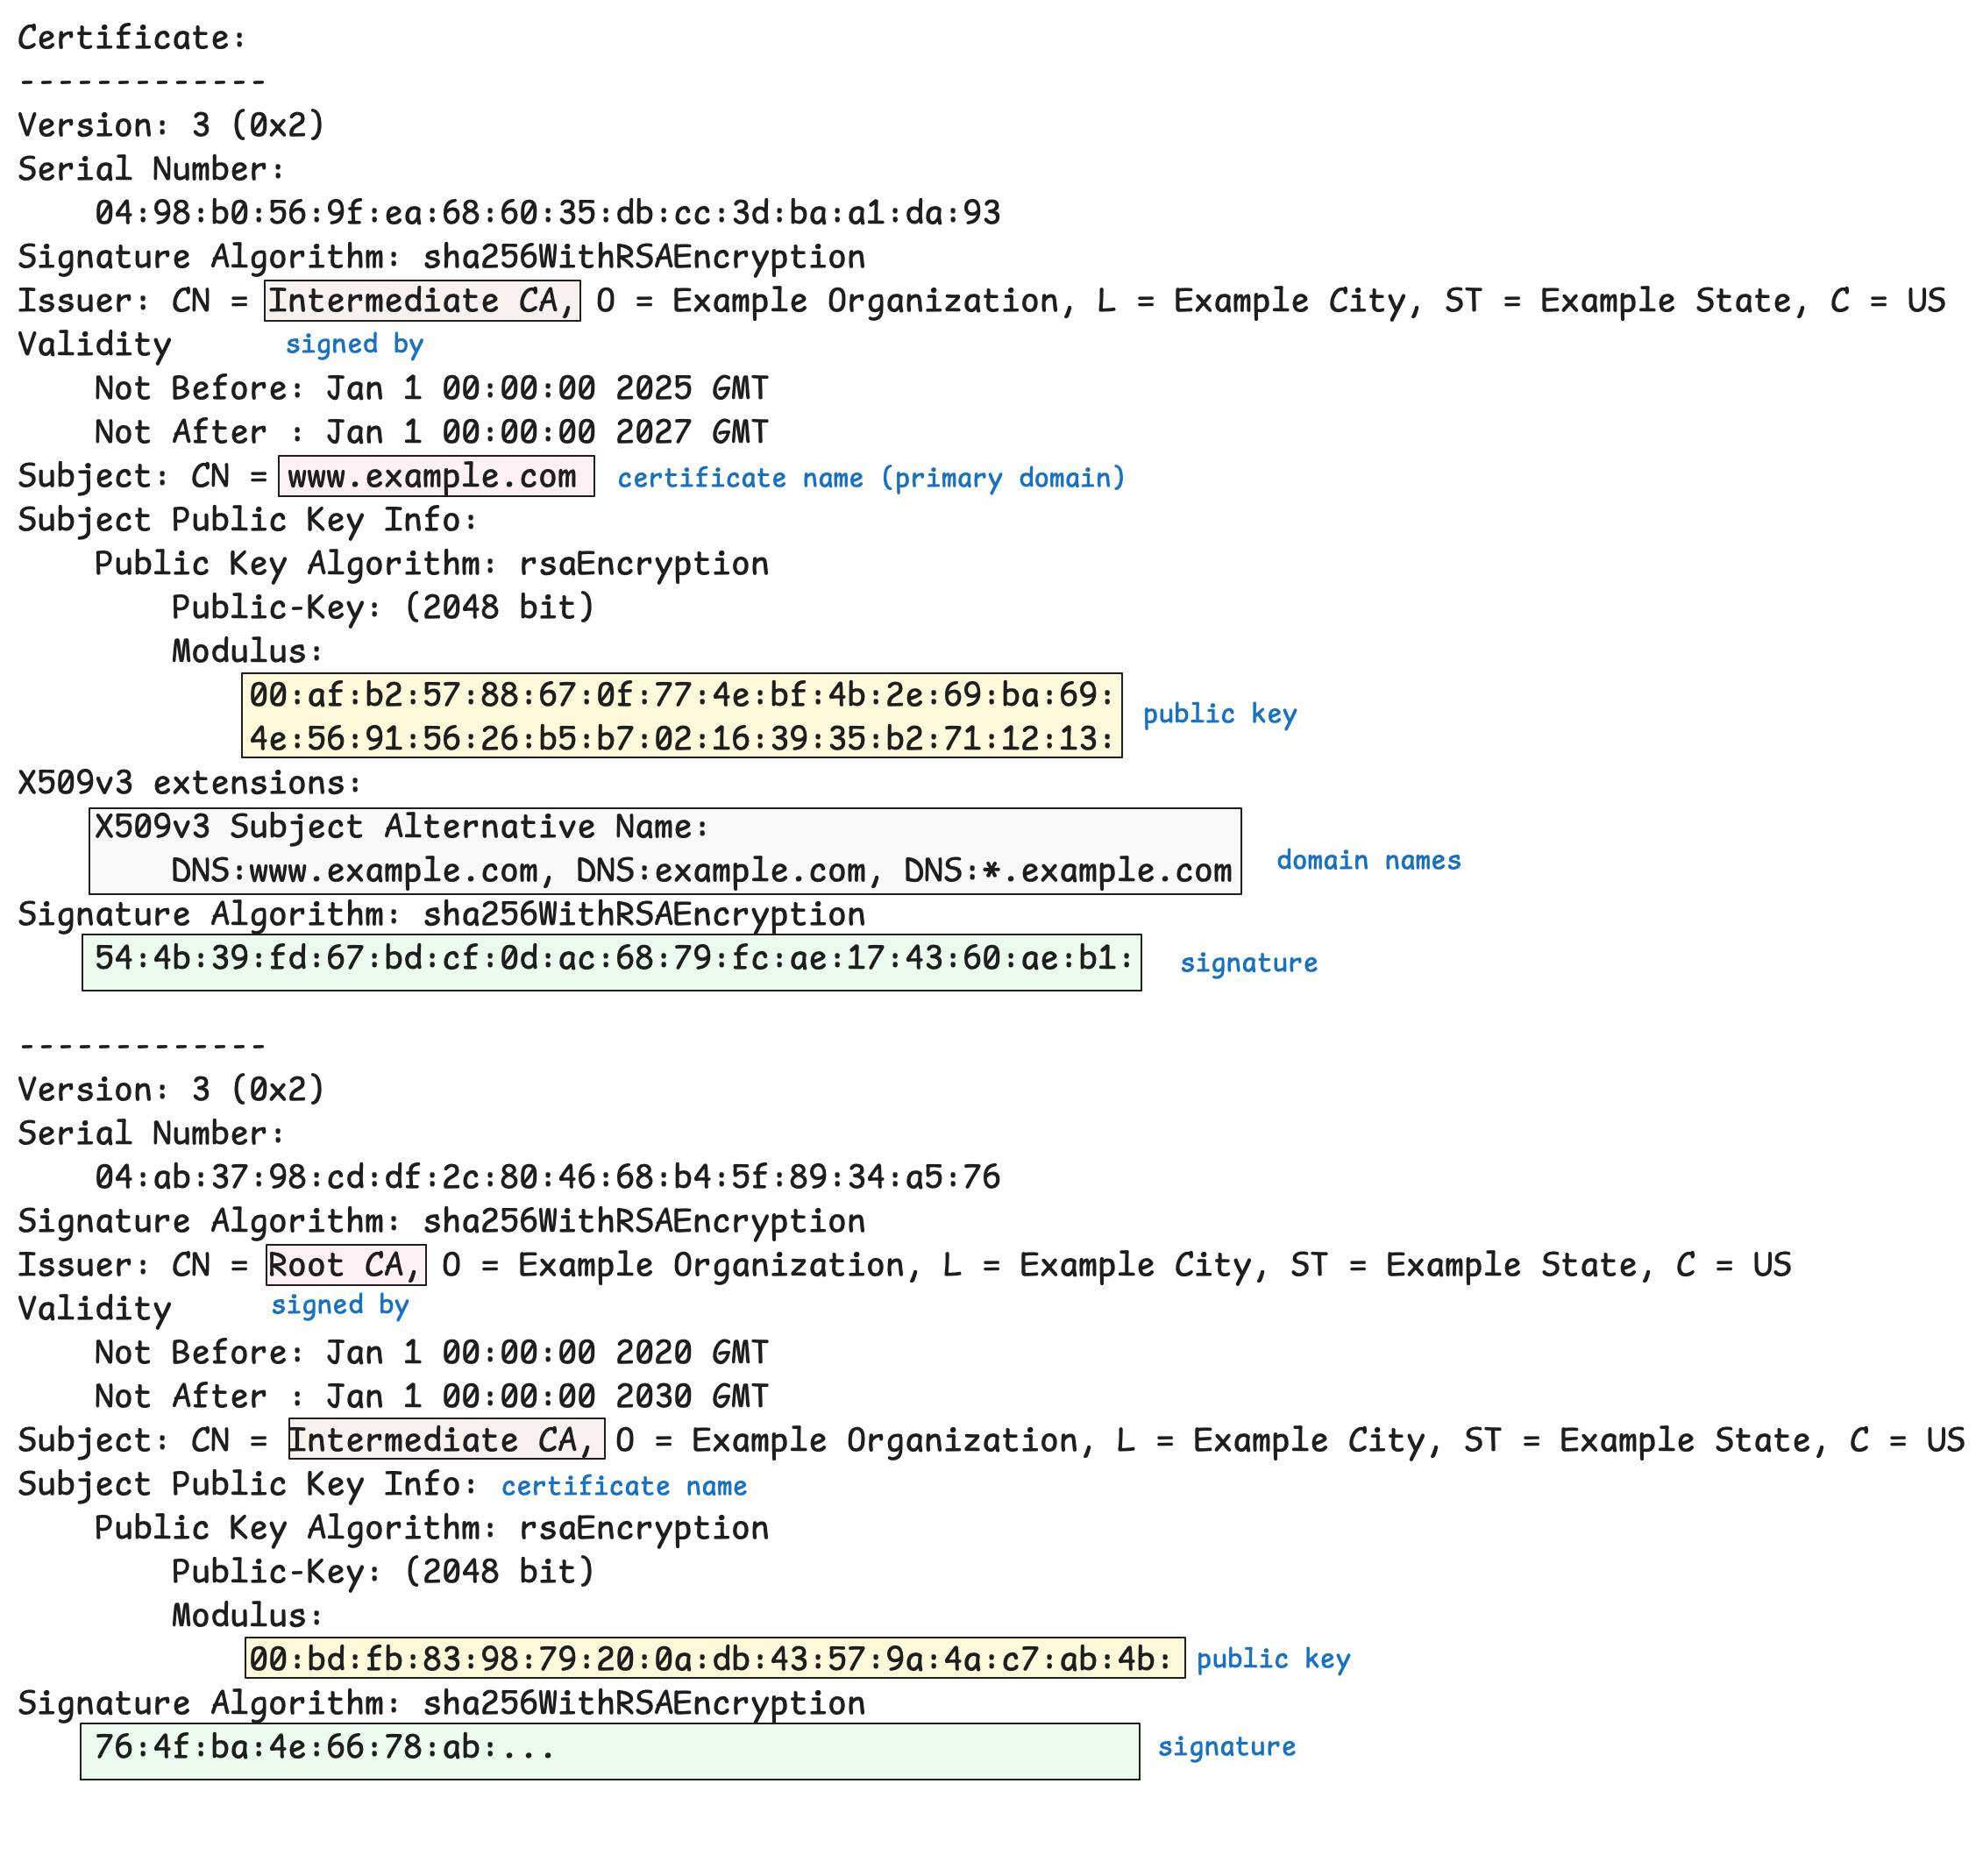
- The Issuer field specifies which CA signed the certificate. It could be an intermediate CA or the Root CA.
- You can also notice that the public key is part of the certificate.
- The leaf certificate for this website only allows the domains
www.example.com,example.comand*.example.com. If you try to use any other domain that doesn’t match any of these, the certificate validation will fail. - The Subject field indicates the entity to which the certificate belongs (e.g., a website) or, in the case of a CA certificate, the name of the CA.

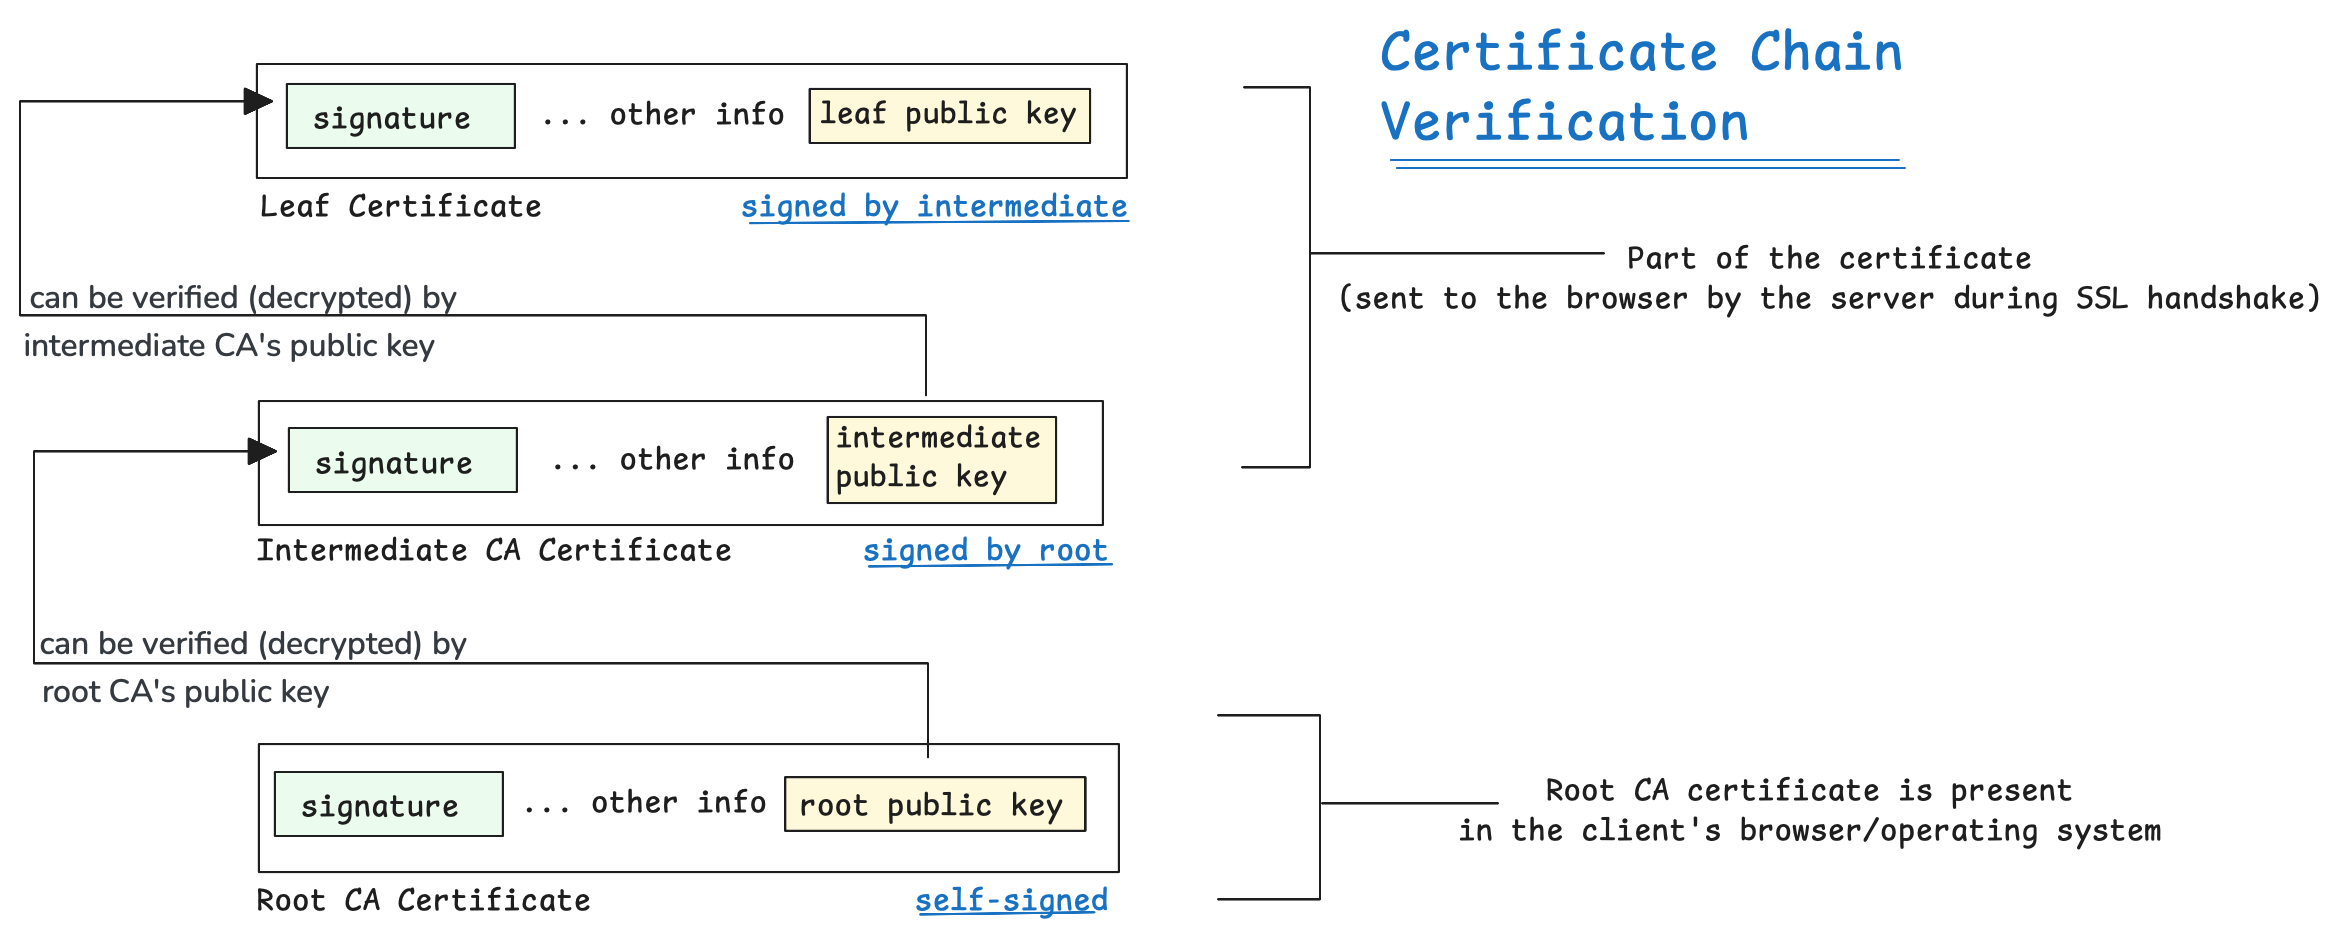
When a browser or client receives a certificate, it follows this validation process:
- Verify the leaf certificate – The browser decrypts the signature on the leaf certificate using the intermediate CA’s public key. If the extracted hash matches the computed hash of the certificate’s contents, the signature is valid.
- Verify the intermediate CA’s certificate – The browser decrypts the signature on the intermediate CA’s certificate using the Root CA’s public key. If the signature is valid, trust is extended to the intermediate CA.
- Check the Root CA’s certificate – The Root CA’s certificate is already trusted because it is pre-installed in the browser or operating system. If all signatures are valid and the certificate chain leads to a trusted Root CA, the website’s TLS certificate is considered trusted.
Trust Store and Root CA Certificates
One crucial point is that the Root CA certificate is not sent by the server. Instead, it is pre-installed in the client’s trust store (a list of trusted Root CAs maintained by browsers and operating systems). If a Root CA is missing from this trust store, the certificate chain will be considered untrusted, even if all signatures are technically valid.
On Linux systems, the trusted root certificates are typically managed using the ca-certificates package. This package contains a collection of Root CA certificates that are recognized as trusted by the system.
Certificate Structure & Extensions
X.509 is the standard that defines certificate structure which contains several critical fields beyond the basic details like subject, issuer, and public key.
The common file formats for encoding X.509 certificates include:
- PEM (
.pem,.crt,.cer) – Base64 encoded, commonly used in web servers. - DER (
.der,.cer,.crt) – Binary format, often used in Windows environments. - PKCS#12 (
.pfx,.p12) – Bundles certificates with private keys, commonly used in Windows and enterprise environments.
Certificate extensions are optional fields in an X.509 certificate that provide additional information about the certificate’s usage, restrictions, and attributes. They allow certificates to support various security policies.
Some important extensions for TLS include:
- Key Usage – Specifies allowed cryptographic operations (e.g., key encipherment, certificate signing).
- Extended Key Usage (EKU) – Defines specific use cases (e.g., TLS server authentication, email protection).
- Subject Alternative Name (SAN) – Lists additional domains/IPs the certificate covers.
- CRL Distribution Points & OCSP URLs – Points to revocation information.
Certificate Revocation
Certificates have an expiration date (typically 1–2 years), but sometimes they need to be revoked early (e.g., if the private key is compromised).
Revoked certificates are checked via:
- Certificate Revocation Lists (CRLs): A CA-published list of invalid certificates.
- Online Certificate Status Protocol (OCSP): A real-time revocation check.
Corporate Certificates and Private CAs
If you work in a corporate environment, you’ve probably had to install or update your company’s certificate at some point. This is because when you access https://mycorp-private.com, its certificate is signed by a private Root CA that’s only trusted within your organization. Since this Root CA isn’t publicly recognized, you need to manually install it on your system. Once installed, all connections to https://mycorp-private.com can be securely encrypted with TLS.
This differs from public websites like https://google.com, where certificates are signed by widely trusted Root CAs that are already present in your system or browser.
Self-Signed Certificates
A self-signed certificate is one that is signed using its own private key rather than being issued by a Certificate Authority (CA). These are commonly used to create Root CAs. Generating a self-signed certificate is straightforward and can be done with the following command:
openssl req -x509 -newkey rsa:4096 -keyout key.pem -out cert.pem -days 365Self-signed certificates are not suitable for public websites because browsers do not trust them, as they lack validation from a recognized CA. However, they are useful for testing and development environments.
Conclusion
TLS does more than encrypt data it proves you’re talking to the right website. The certificate chain, digital signatures, and trust stores all work together to keep the internet secure. Next time you see that lock icon in your browser, you’ll know the complex system behind it. Stay curious, and stay secure!